NOTE: If you get the warning about this page wanting to run scripts or an ActiveX control, it's because of a couple javascript routines to play sounds, display a cursor, graphics, or improve navigation. There are no ActiveX routines associated with this page. I don't do viruses or hacker crap, but it's your choice...You won't miss anything important by refusing permission.

HOW TO BUILD A MODELER'S SANDING BOX

and Cutting Small Scale Box Joints

INTRODUCTION

click and drag
I'm no expert modeler or woodworker but sometimes do crafts which require sanding of small pieces in wood, metal and various plastics. Inhaling dusts is never healthy, and some materials used in arts and crafts are seriously toxic.

I don't own a dust collection system and my work table is indoors, not in a garage. Out of consideration for my lungs and distaste for housekeeping I needed a convenient way to collect the dust.

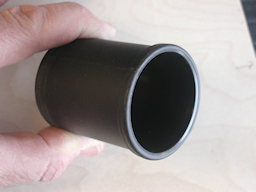
What I had to work with is a small shop vacuum purchased at a home improvement store.

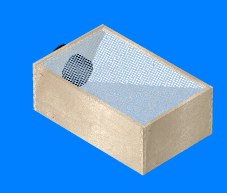
A few years ago Masterpiece Models (I lust for their Time Machine kit) sold a very nice modeler's sanding box made of ABS plastic, but this item is no longer available. I decided to try to design and construct a substitute.

The most obvious factor in the design was that the box be large enough to provide a comfortable work surface but preserve sufficient suction that the dust is effectively removed. John Geigle of Masterpiece Models responded to my inquiry and provided the dimensions of his unit (roughly 10 x 5 inches), which he said was small enough for most vacuums to handle.

For convenience, in the design shown here the dimensions of the work surface match one-half of a sheet of standard (9 x 11 inch) sandpaper.

To some extent, the height of the box is dictated by the diameter of the vacuum hose fitting. Something else I'm not is an engineer, but it seemed to me it would be desirable to reduce the internal volume of the box without obstructing airflow. To accomplish this, I decided to make an internal baffle of aluminum sheet. CG prototyping helped me come up with one possible shape that was functional and practical to make with the tools I have available.

Not everyone will have access to some of the tools shown. I also admit that my design choices are sometimes motivated by the urge to try out new tools and techniques. This design can be simplified by, for example, substituting thicker wood, using wood strips instead of dadoed slots to support the work surface and baffle, changing the baffle to a simple incline, eliminating the baffle entirely or using a joining technique other than box joints.

If you really want to save time, find a wooden cigar box of adequate depth and use that for the body. But, that would be cheating and no fun--there'd be no excuse to gratify the need for more tools.

Navigate this tutorial using the icons at the bottom of each page, or the index dropdown dropdown at the top.

The tools you choose are up to you, as is their safe use. Wear proper protective gear and educate yourself in all appropriate safety precautions before working with the tools and materials.

NOTE: There are separate lists of materials and tools in the following pages.

MATERIALS

  • 1/4 x 4 inch x 4 foot poplar [NOTE: The listed dimensions are nominal. The actual width is 3.5 inches.]
  • perforated aluminum sheet
  • plain aluminum sheet
  • 1/4 inch square basswood stock
  • vacuum hose fitting
  • wood glue
  • Gorilla tape - or alternative
  • spray artist's adhesive - optional

poplar and aluminum sheet I'm most comfortable working with wood, so that formed the body of the box in my design. The poplar is cheap, fine grained and easily found at a home improvement store in convenient pre-cut widths. Because it is precut, we save some time and don't have to worry about the sides being uneven. You could substitute any plywood or hardwood of a comparable thickness. However, I would recommend against using plywood as we are working at a small scale and there is a high risk of it delaminating during the cutting and assembly.

Plain aluminum sheet can be found at some hardware or home improvement stores, or you can use a piece cut from a roll of aluminum flashing. The piece I had on hand was 1/64 inch thick.

.
perforated aluminum sheet The perforated aluminum sheet came from Small Parts, Inc. They sell a variety of perforated aluminum sheets with holes of various sizes and spacing. I decided to use the

Aluminum 3003-H14 Perforated Sheet 20 Gauge .032" Thick 33 Holes Per In. x 12" Wide (PMA-125-A)

It's sold in 12 x 12 inch sheets ($12.48/sheet plus shipping at the time of this writing). We'll be using a bit less than half the sheet.

I strongly recommend also checking McMaster-Carr's website. I've found their prices and shipping charges to be economical on comparable items.

vacuum fitting If you followed the small shop vacuum link above, you know the reason I needed to fabricate the vacuum hose fitting. With any luck, you can find a pre-fabricated fitting for your vacuum hose.


NEXT PAGENEXT PAGE

bilagaana's Home Page

more stuff from bilagaana

All original contents copyright bilagaana. All rights reserved.

This page uses the optional Paddington font.
The CG sanding box was rendered in good old Ray Dream Studio.