INTRODUCTION
I was given some diamond willow to make into hiking sticks.
After all the effort of sanding and varnishing I wanted to put some kind of tip on the ends to reduce damage.
Metal and slip-on rubber cane and crutch tips are available. The problem with these is that the ends of diamond willow sticks vary greatly in diameter and are unlikely to have smooth circular cross sections. For that matter, the same is true of many other varieties of wood. I didn't want to buy a bunch of different sized tips which would be unlikely to stay securely on the ends. Besides, a rubber crutch tip makes a beautiful wood stick look like an orthopedic appliance.
The following illustrates one method to attach a protective rubber tip directly on the end of a hiking stick. It has the advantage that the tip can be easily replaced as it becomes worn.
MATERIALS
- rubber bumper
- threaded coupler
- lock washer
- epoxy cement
- Loctite threadlocker
- electric drill
- twist drill bit
|
Astro-Tex is one company that makes a wide variety of rubber tips and bumpers: slip-on, adhesive-backed, screw-on, stem bumper, etc. I recommend looking over their selection to see the many styles and sizes available. Their minimum order is fifty dollars--which would buy dozens, if not hundreds, of tips (hereinafter: bumper). However, they were very helpful in recommending McMaster-Carr Company as an alternative source.
 |
|
McMaster-Carr's selection of bumpers is more limited, but they are available in smaller quantities. [Their catalog makes extensive use of frames, so I won't provide a direct link to that page. It's best to go through the McMaster-Carr homepage and type "rubber bumpers" into the search field.]
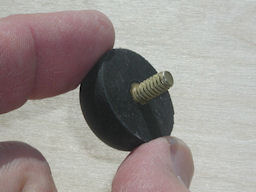
I chose the Rubber Bumper without Metal Core, Round, 1" Diameter, 10-24 Threaded Stud, McMaster Carr stock number 9541K3. These are made of an abrasion-resistant Hard SBR Rubber. They are sold in packages of 25 for $10.13/pkg at the time of this writing.
The one inch diameter was a good compromise for most of the sticks I have to work with. I chose the bumpers without metal core in case I needed to trim them for the smaller sticks.
NOTE: McMaster-Carr doesn't show the shipping charge until the time of shipment. I live within thirty miles of one of their distribution centers; the package was delivered within one working day for $4.50.
|
 |
|
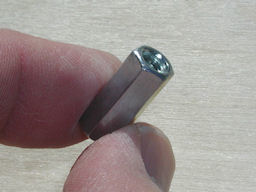
Threaded couplers are available at your neighborhood hardware store for less than $1.00/each. I would recommend steel over aluminum, for durability and improved adhesion.
Make certain the thread size (i.e.: 8-32 or 10-24) matches the bumpers you ordered.
Also, get some appropriately sized lock washers.
|
.
|
|
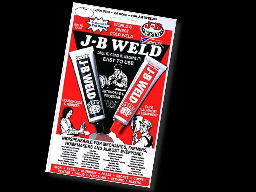
For an adhesive, I chose good old JB Weld, but any quality epoxy adhesive should work. Bonding metal to wood can be tricky, and the assembly (below) introduces some limitations as to what would be a practical adhesive.
|
STEPS
|
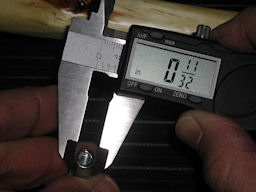
- Start by measuring the threaded coupler. You need to determine the length and the diameter. As the couplers are hexagonal in cross-section, be sure to measure across the widest part (angle to angle).
| |
|
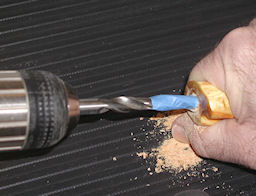
- Choose a drill bit of the approximate diameter determined in the first step (above). The fit should be reasonably snug, and you should factor in that vibration and an unsteady hand during drilling will likely cause some unpredictable further increase in the hole's diameter.
- Mark your bit with a depth indicator to match the length measurement in the first step (above).
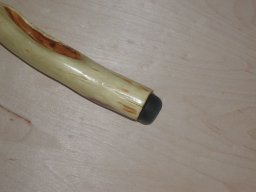
NOTE: You'll notice in this photo that I failed to square the tip of the stick. It did not occur to me that this was necessary, until it came time to actually screw in the bumper. Learn from my mistakes.
| |
|
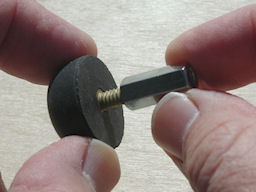
- Assemble the bumper and coupler. This will make the test insertion easier and the application of the adhesive a whole lot less messy.
- Test the fit of the assembly in the end of the stick for depth and tightness.
| |
|
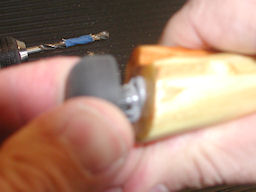
- Mix the epoxy according to directions and apply it to the surface and distal end (opposite the bumper) of the coupler. So long as you don't overdo it, don't worry about it getting into the coupler at that end. The couplers are typically far longer than the length of the bumper's threads.
- Insert the assembly into the hole and immediately carefully unscrew the bumper.
|
|
|
- Wipe off the excess adhesive and set the stick aside to cure according to the adhesive manufacturer's directions.
|
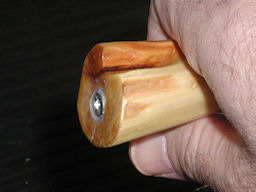 |
- When everything's dry, put a lock washer on the bumper threads and screw the bumper into the coupler.
In use, I've found the bumpers can easily work loose. It's a good idea to put some Loctite threadlocker on the bumper threads before screwing it into the coupler.
|
 |
I hope these instructions are useful. Any constructive comments or suggestions would be welcomed.
To purchase DIAMOND WILLOW STICKS and to learn more about working with this interesting wood, visit Ken Laninga's comprehensive STICKSITE.
| The tools you choose are up to you, as is their safe use. Wear proper protective gear and educate yourself in all appropriate safety precautions before working with the tools and materials.
|