Updated 26 February 2000
Things the RAY DREAM Manual Doesn't Tell You
CREATING STEREO PAIRS IN RDS
 INTRODUCTION
An under-utilized feature of so-called 3D software is the ability to create true stereoscopic 3D output ("stereo"). This tutorial will spare the usual lecture on the theory and mechanism of human depth perception and provide you with the basic steps to quickly produce images of amazing depth and realism for display on your web page.
STEREO FORMATS
There are several formats for displaying stereo on the web, among them: anaglyph (red/blue and red/green), stereo pairs (parallel or cross-eye formats) and electronically interlaced images for use with shutter goggles. Stereo pairs are the most accessible, because they don't necessarily require any additional hardware. Most people can, with some practice, visualize stereo images using either parallel or cross-eye viewing--techniques known as free-viewing. A significant limitation of free-viewing is that it may be good enough for small or narrow images, but becomes progressively more difficult as image size increases.
I'm going to refer you to Gary Gorby's excellent site for a brief discussion of the various techniques. But, my opinion is that the method most likely to produce the best results and the fewest headaches--seriously, it's less painful--is parallel.
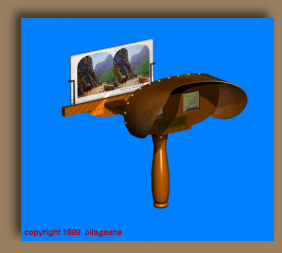
| With parallel format, you can also further reduce eyestrain by getting some very inexpensive (under two dollars) plastic hand-held print viewers. These comfortably merge the two images with almost no effort or training and make parallel stereo pairs the closest thing to the traditional stereoscope (see the illustration, above), ViewMaster or Stereo Realist images most people have seen at some time or other. You don't need these lenses to view parallel images, but they are a convenience and can be used for other stereo applications. |
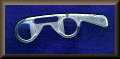
GET A VIEWER |
The cross-eye method requires a bit more practice and quickly becomes tiring, but requires no additional hardware.
SCENE COMPOSITION
You can make a stereo image of almost any scene, but it's a truism in stereo photography that the best shots will have objects in the foreground, middle ground (where the main object of interest is placed), and background. This arrangement enhances the sense of depth and you should compose your scenes to this scheme whenever possible.
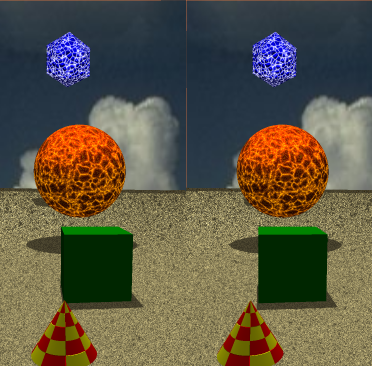
As an example, the following illustration is a stereo pair in the parallel format with objects scattered front to back. It will also give you a chance to practice free-viewing:
Sit a comfortable distance from the screen and look--don't stare--at the dividing line between the two images. Let your eyes relax (as if gazing into infinity, focusing past the line), until you start to see three images. Pick a convenient object within the scene as a reference and gradually bring the two parts of it together until the center virtual image pops into three dimensions. Moving your head nearer or further from the screen sometimes helps.
PROCEDURE
The steps to creating a stereo pair are simple and straightforward:
STEPS
- Open the scene file in RDS.
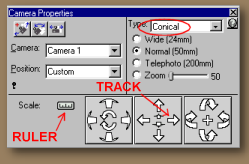
- Set the camera type to Conical (isometric won't work) and compose your scene.
- Select Render/Current Scene Settings/Output...
- Set dpi to 72 (the standard web browser resolution).
- Set file size to some comfortable width and height. Remember that the images will be presented side-by-side within the browser window, so should be something less than about 300 pixels wide.
- Set File Type to jpg. I prefer png for better quality, but some browsers won't yet display this format. Gif is another option; the choice is yours.
- Set up your camera for the left image.
- Render the scene. Save this image named as the left image.
- In the hierarchy (or time-line) select the render camera, then shift-select the object in your scene which is the focus of attention. Both of these objects should stay selected for the next step.
- Select Windows/Properties. The only tab visible in the Properties window will be Distance. Note the distance shown between the two objects.
- Divide that distance by 30. This is a standard method used to calculate the separation of camera positions in stereo imaging and produces a good stereo effect in most instances. You can increase this value to produce the hyperstereo effect--exaggerated depth. This can be useful when the scene is a landscape, or any time the primary object is a long distance from the camera.
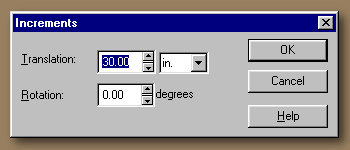
- Select Windows/Camera Properties. Press the little ruler and the Increments window will appear. (See the illustration, below.)
- Set the Translation to the value calculated in Step 11, above. Change just the value, leave the units alone. Then, press OK.
- Click once on the TRACK control Right arrow. Don't use Dolly or Rotate...only Track.
- Render again. Save this image as the right image.
DISPLAYING THE STEREO PAIR
Now you need to design a web page to display your images. Copy and paste the following code into your web page HTML file and insert the names of the saved jpg's where indicated:
<CENTER>

<TABLE>

    <TR>

        <TD>Insert LEFT IMAGE Here</TD>

        <TD>Insert RIGHT IMAGE Here</TD>

    </TR>

</TABLE>

</CENTER>
|
For parallel viewing, put the left image in the left table element and the right image in the right table element.
For cross-eye viewing, put the left image in the right table element and vice versa.
View the page in your browser.
STEREO IMAGE SITES
Robert Hurt's Digital Gallery contained the first stereo image I ran across created in 3D software--a beautiful rendering of the Valles Marineris. It was one of those slap yourself upside the head moments. I've been doing stereo photography for 25 years, and extending it to Ray Dream never occurred to me before I saw that picture.
Definitely take the time to visit Gary Gorby's site, mentioned above. He has a fine collection of realistic and abstract scenes, presented in a variety of formats. Gary's site was the first I saw to use the DepthCharge plugin (see ADDITIONAL RESOURCES, below).
The most impressive RDS stereo images I've seen are Robby Woodard's Krazy Kat, Ignatz and Boris & Norky. Beyond that, they represent some of the finest RDS work ever in the technical proficiency of the modeling, shading and attention to composition.
Garry Salisbury has rendered some of his creations into stereo pairs. Garry is an inveterate (not to say invertebrate) experimenter and one of the most inventive of Ray Dream users. The first image in the series--"Playground"--is, with all due respect to all the other RDS artists whose work I admire, my all-time favorite RDS image. Re-rendering it into a stereo pair only makes it more admirable.
Santa's Helper is a very nicely done example of a stereo pair by someone whose name is missing from my records. I'd like to see him do more.
I'm not a fan of anaglyphs--the stereo effect isn't as clean and the colors are inevitably distorted by this technique. However, because of his obvious interest in stereo imaging I want to direct attention to Richard Donato's gallery. He takes great care in his work and the results show. He also has a few stereograms on his site. I keep trying to convince him to render some of his anaglyph images into stereo pairs; the results would be fun to see.
I have a few examples of my RDS stereo pairs in my Stereo Index.
There is a Stereoscopic 3D Web Ring, of course. Every weird little sub-culture has a web ring. Spend some time cruising this ring and you will learn more than you ever wanted to know about the technology and neuroanatomy of human depth perception. There are also collections of images, some very cool.
If you have a site with stereo images, let me know. While I have no intention of turning this page into a web ring for RDS stereo images, I will consider it for inclusion.
ADDITIONAL RESOURCES
The free VRex DepthCharge plugin works within your browser to allow selecting among a half-dozen different stereo image formats.
To present your stereoscopic images without requiring site visitors to download a plugin, a more accessible alternative than DepthCharge may be the free Stereoscope Applet.
To use either the DepthCharge plugin or the Stereoscope Applet, all you have to do is render one stereo pair. Then, these programs will automatically display the user-selected stereo format -- anaglyph, stereo pair, interleaved, etc. -- without further effort on your part. A dozen formats for the price of one. Amazing!
The DepthCharge Developer's Studio is the package which will produce files for use with the DepthCharge plugin, giving visitors to your site the option to select whatever viewing method they prefer. If you enjoy creating stereo images, this is a good general utility to have. It provides a simple way of aligning stereo pairs, saving in the new jps and pns stereo formats, handles paired jpeg, bmp and other formats, and can create stereo animations. The current price is $79 and includes LCD goggles (see next paragraph).
I believe this software is Windows only at this time. The VRex site has a large gallery of stereo images viewable using the DepthCharge plugin, and some excellent technical notes on stereo imaging. A note about the VRex Surfer LCS (liquid crystal shutter) goggles: Their installation is far from straightforward and I could not get these to work with my system. Fortunately, they were included with the Developer's Studio package at no extra cost (yeah,right).
3D Stereo Image Factory Plus is a package which allows viewing, manipulating and printing of stereo pairs, saving in multiple stereo formats (not including DepthCharge) and the production of stereo animations. It's priced at $99, but has many features and options and a well-designed interface. The VRex Developer's Studio is obviously extensively based on its design.

All constructive comments, suggestions, and corrections are welcomed.
All contents copyright 1999-2000 bilagaana. All rights reserved. The images may not be copied in any form without the permission of the author. Digitally watermarked.
)