Things The Ray Dream Manual Doesn't Tell You

APPLYING A TEXTURE MAP TO ALL SIX SIDES OF A BOX


Note: The Detailer manual has a discussion of this topic, pp.275-8. This tutorial assumes that you have only RayDream available to you. Additional information is contained in the Ray Dream manual, as noted below. This tutorial uses information found in both manuals, though neither manual provides step-by-step instructions.


One way to get different images on each of a rectangular solid’s faces is to use paint shapes and individually apply them to the faces.

But, in this example, we are going to apply a .bmp texture map to all six sides of a cube at one time. A different image will appear on each of the six sides. We are using a cube for the sake of simplicity but, with a little modification, these instructions will work for any rectangular solid. Temporarily, I'm not going to discuss the actual orientation of the faces. That will be in the next revision.

We will be using Parametric Mapping, the default mapping mode for native RDS objects. This is said to produce a better quality image than the Projection Mapping Modes (Box/Face, Spherical or Cylindrical) available through the Properties Palette, though the difference can be difficult to discern. [Box/Face Projection Mapping can be used, though the layout of the box faces in the texture map to be applied is slightly different (see the Addendum, below)].

  1. In your favorite bitmap editor, create a .bmp file with an aspect ratio of 3:4 (i.e.: Three units of width for every four of height. As an example: 144 pixels wide by 192 pixels high). If your editor lets you overlay a grid on the image, so much the better; you will want to lay out a grid that shows three squares along the width and four squares along the height. You end up with a grid of twelve (virtual) squares, which we will number as follows:

    1 2 3
    4 5 6
    7 8 9
    10 11 12

    (If you can’t create a grid, no big deal—just tape a piece of tissue paper onto your screen and divide the blank image into the twelve squares, or carefully watch the cursor coordinates to position the text in the next step.)

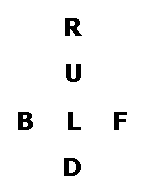
    Parametric Mapping uses the following layout for a cube (this information is hidden in a discussion of VRML on page 385 of the RDS 5.0 manual):

    RIGHT
    TOP
    BACK LEFT FRONT
    BOTTOM

    Referring to the grid (above): the Right face of the map goes in grid 2, the Top face in grid 5, the Back through Front in grids 7 through 9, and the Bottom face in grid 11.

    1. Insert text, so that the final image looks like:


      [This is the nomenclature assigned to the various faces in the Detailer manual: U for Up, B for Back, L for Left, F for Front and D for Down. You could also insert images or numbers, if you prefer. Here, text is used for the sake of simplicity.]

      1. Save the .bmp image.

      2. Start Ray Dream Studio.

      3. Select Create Empty Scene. The Perspective Window will appear.

      4. Select the Cube Primitive and drag it into the Perspective Window. Create a cube of the desired size—make it relatively large, so that it’s easy to see.
      5. Select View/Preset Position/Reference.
      6. Select Better Preview Quality.
      7. Select Windows/Current Shader Editor.

      8. In the Current Shader Editor, select View/Flat Preview.
      9. In the Current Shader Editor, the Color tab should be active and there should be either a color chip of the default primer color or a gray box enclosing the words "Unmodified Channel – Drop your shader here"
      10. In the Current Shader Editor, select Insert/Texture Map, and then browse until you locate the .bmp map created in Step 2 (above). The image selected should appear in the Shader Preview and in the Color tab.

      11. In the Perspective Window, click once on the cube primitive to make it active.
      12. Select Windows/Properties. When the Properties: Cube (Primitive) window appears, click once on the Mapping Mode Tab.
      13. In the Mapping Mode Tab, verify that Parametric Mapping has been selected from the drop-down menu.
      14. Drag-and-drop the Shader Preview onto either the cube primitive in the Perspective Window, or onto the Cube object in the Hierarchy Window

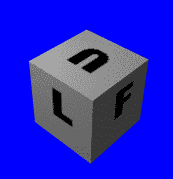
        You should now be able to see the letters in position on each of the visible sides.

        1. Select the Virtual Trackball Tool and rotate the cube around to verify the placement of the letters on the cube’s surface.

          If the object to be mapped is not a perfect cube, it is a relatively simple matter to change the dimensions of the original grid elements to match the individual faces of your object. (The Detailer manual has an excellent discussion of how to size the individual image elements on pp. 275-8.) All the other steps remain the same.


          ADDENDUM

          Using Projection Mapping

          If you are using Box/Face of the Projection Mapping modes—the placement of the faces must be slightly different.

          The layout of the faces will be as follows:

          TOP
          LEFT FRONT RIGHT BACK
          BOTTOM

          The following steps are, again, for a cube:

          1. Create a .bmp file with an aspect ratio of 4:3 (i.e.: Four units of width for every three of height. As an example: 192 pixels wide by 144 pixels high). You end up with a grid of twelve (virtual) squares:

            1 2 3 4
            5 6 7 8
            9 10 11 12

            1. Insert text, so that the final image looks like:


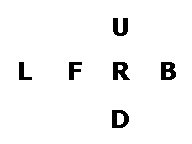
              [The "U" goes in square number 3 (as shown in Step 1 (above)), "L" through "B" go into squares 5 through 8, and "D" goes into square 11.]

              The remainder of the steps are essentially the same as outlined in the Parametric Mapping section, except:

              1. Click on the cube primitive in the Perspective Window to make it active.
              2. Select Windows/Properties. When the Properties: Cube (Primitive) window appears, click once on the Mapping Mode Tab.
              3. In the Mapping Mode Tab, select Box/Face/Full Box from the drop-down menu.
              4. Drag-and-drop the Shader Preview onto either the cube primitive in the Perspective Window, or onto the Cube object in the Hierarchy Window.
                Tutorial Index


                All constructive comments, suggestions, and corrections are welcomed.

                All contents copyright 1998-2000 bilagaana. All rights reserved. The images may not be copied in any form without the permission of the author. Digitally watermarked.